{blog}


  • Laravel with SSL through Cloudflare on Heroku.

    Laravel with SSL through Cloudflare on Heroku.

    I deployed a Laravel app on Heroku, using Cloudflare for SSL. As a quick note, here’s how I did it.

    1. Deploy the app on Heroku and make sure everything works fine using the heroku app url.
    2. Add the domain names to your app in Heroku (in the settings tab for the app). Make sure you add both the root domain and www if you’re using it (example.com, www.example.com). Don’t activate SSL in Heroku.
    3. Add the site to your Cloudflare account (choose the free plan, when asked).
    4. Point your domain to Cloudflare by changing the name servers  (at the registrars control panel) to the ones Cloudflare gives you when adding the site.
    5. Wait for the name server changes to go through. It will be notified under the Overview tab on Cloudflare. When this is done you will administer the domain records on Cloudflare instead of your domain regristrar.
    6. Remove all the DNS records you don’t need, under the DNS tab in Cloudflare.  For the next step to work you need to remove the A records for the root domain – since you won’t point it to an IP address, but a domain on Heroku.
    7. Point Cloudflare to your Heroku app by adding cname records pointing to the Heroku app url.
      Like this.

      Type: CNAME
      Name: jymden.com
      Domain name: myapp.herokuapp.com


      Type: CNAME
      Name: www
      Domain name: myapp.herokuapp.com


    8. In Cloudflare, go to the Crypto tab. Set SSL to Full:
    9. Make sure your Universal SSL certificate is activated. This will happen automatically a little while after adding the site to Cloudflare (up to 24 hours, but usually faster).  When it’s activated you’ll see it a bit down in the Crypto tab, like this:
    10. Prepare your Laravel app to use https by adding this to the boot function AppServiceProvider.php (App/Providers):
    
    public function boot(UrlGenerator $url)
    {
      if (env('APP_ENV') !== 'local') {
        $url->forceSchema('https');
      }
    }
    
    PHP

    NOTE: if you’re using Laravel 5.4 or higher it’s forceScheme instead of forceSchema

    Also, you need to set your Laravel environment variable APP_ENV to production (or at least something else than local). Do this in the Heroku app settings tab.

  • Now try to enter your site with https. It might take a while for it to kick in.
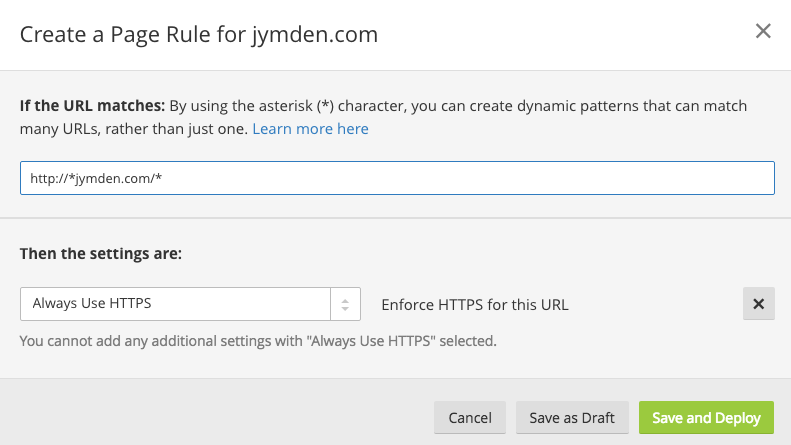
  • When you see that https is working correctly, go in to the Page Rules tab in Cloudflare. Click Create Page Rule and add the rule to always use https for the domain. Use wildcards to cover all urls. Like this:
  • Drink coffee.

  • Use include method in IE

    Use include method in IE

    Here’s a hack for using the includes method also in the horrible Internet Explorer.

    if (!String.prototype.includes) {
      String.prototype.includes = function() {
        "use strict";
        return String.prototype.indexOf.apply(this, arguments) !== -1;
      };
    }
    JavaScript


  • Serve Laravel to the web

    Serve Laravel to the web

    This will make your Laravel instance available on the web. Make sure your router have port 80 forwarded to your machine. Also make sure no other server applications is blocking the port.

    php artisan serve --host 0.0.0.0 --port 80
    Bash


  • Sort array of objects by property value

    Sort array of objects by property value

    usort($myArray, function ($a, $b) {
        return strcmp($a->myPropery, $b->myPropery);
    });
    PHP

    Sort by predefined order:

    $predefinedOrder = [1, 5, 2, 6];
    
    usort($arrayOfObjects, function ($a, $b) use ($predefinedOrder) {
    
        $flipped = array_flip($predefinedOrder);
        $left = $flipped[$a->myPropery];
        $right = $flipped[$b->myPropery];
        return $left >= $right;
    });
    PHP


  • Add column to table in Laravel

    Add column to table in Laravel

    Create migration in console:

    php artisan make:migration add_mycolumn_to_mytable
    Bash

    Use Schema::table() to access existing table (instead of Schema::create() for creating new tables)

    public function up()
    {
        Schema::table('mytable', function($table) {
            $table->text('mycolumn');
        });
    }
    public function down()
    {
        Schema::table('mytable', function($table) {
            $table->dropColumn('mycolumn');
        });
    }
    PHP

    Then run migrations:

    php artisan migrate
    Bash

  • Allow Composer to connect to http/https

    Allow Composer to connect to http/https

    If you have problems with Composer not allowing to update to http-connections add this to composer.json (not recommended to keep in production)

    config : {
      "secure-http" : false
    }
    JSON


  • (WordPress) Generate post title from custom field

    I had a custom post type that only used custom fields, so I needed to generate a post title from there.
    Here’s one way. You can if course chain as many if else as you want to check other types.

    functions.php
    [php]
    function custom_post_type_title($post_id)
    {
    global $wpdb;
    if (get_post_type($post_id) == ‘staff’) {
    $name = get_post_custom_values(‘name’);
    $title = $name[0];
    $where = array(‘ID’ => $post_id);
    $wpdb->update($wpdb->posts, array(‘post_title’ => $title), $where);
    }
    }

    add_action(‘save_post’, ‘custom_post_type_title’);

    [/php]


  • Laravel helpful plugins

    Laravel helpful plugins

    Generate Seed from Database
    https://github.com/orangehill/iseed

    Generate Migrations from Database:
    https://github.com/Xethron/migrations-generator


  • (JS) Newline to br

    Replaces newline characters with <br> tags in the same style as the php nl2br function

    // newline to br - php style
    function nl2br(str, is_xhtml) {
        let breakTag = (is_xhtml || typeof is_xhtml === 'undefined') ? '<br />' : '<br>';
        return (str + '').replace(/([^>\r\n]?)(\r\n|\n\r|\r|\n)/g, '$1' + breakTag + '$2');
    }
    JavaScript


  • (Ruby) Ruby on Rails doodles

    Create new Ruby-on-Rails project. By default RoR comes with SQLite support, unless you state otherwise (-d mysql).
    [ruby]
    // Create project. With mysql support
    rails new my_project -d mysql
    [/ruby]