{blog}


  • Bash script to build and install an Android Flutter app

    Bash script to build and install an Android Flutter app

    When developing an app you generally go through many cycles of testing your app on a physical device. That’s very easy with flutter. You just say one of these:

    flutter build apk --release
    flutter build apk --debug
    flutter build apk --profile

    possibly preceded by:

    flutter clean

    to clear any cached build artifacts. Then you simply run:

    flutter install

    There’s usually no need to script this. But sometimes, you just want to make life a bit easier. That’s why I use the following Bash script in all my Flutter apps.

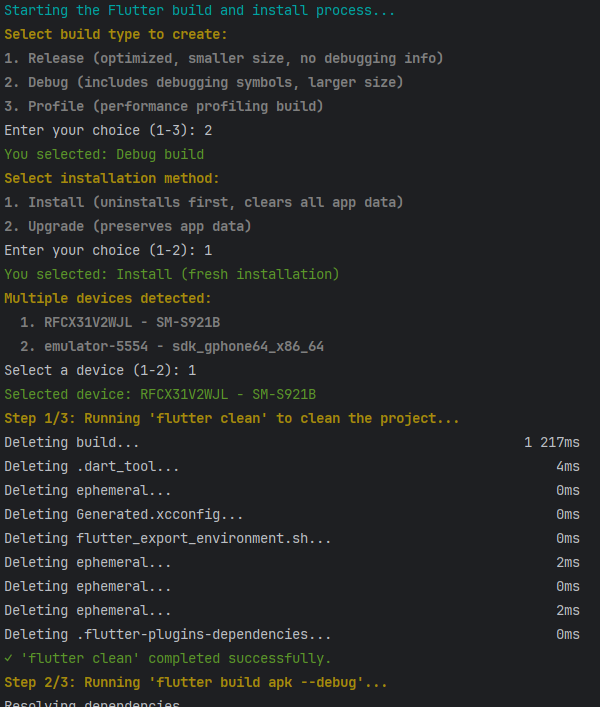
    It lets you choose between release, debug, or profile build types, and whether to do a clean install or an upgrade.

    A clean install will first uninstall your app (erasing all data) before installing the new APK — which is sometimes exactly what you want. But often, I prefer to keep my app data intact and just update the app. That’s easily done using adb (Android Debug Bridge) with the -r flag.

    Testing both flows is important, especially if you’ve made changes to your data structures.


    At the end of the script, you can choose which connected device (including emulators) you want to install the app on.


    Here it is — just save it as build-and-install-apk.sh in the root of your project.

    #!/bin/bash
    
    # build-and-install-apk.sh
    # This script performs the following:
    # 1. Asks user what build type to create (release, debug, or profile)
    # 2. Asks if user wants to install or upgrade the app
    # 3. Asks which device to install the app on
    # 4. Cleans the Flutter project using `flutter clean`
    # 5. Builds APK for the selected build type
    # 6. Installs or upgrades the app on the selected device
    
    # Color codes for output
    RED='\033[0;31m'
    GREEN='\033[0;32m'
    YELLOW='\033[1;33m'
    CYAN='\033[0;36m'
    WHITE='\033[1;37m'
    NC='\033[0m' # No Color
    
    # Function to print colored output
    print_color() {
        echo -e "${1}${2}${NC}"
    }
    
    # Start the script
    print_color $CYAN "Starting the Flutter build and install process..."
    
    # Ask user for build type
    print_color $YELLOW "Select build type to create:"
    print_color $WHITE "1. Release (optimized, smaller size, no debugging info)"
    print_color $WHITE "2. Debug (includes debugging symbols, larger size)"
    print_color $WHITE "3. Profile (performance profiling build)"
    
    read -p "Enter your choice (1-3): " build_choice
    
    # Set build type and file path based on user selection
    case $build_choice in
        1)
            build_type="release"
            build_command="flutter build apk"
            print_color $GREEN "You selected: Release build"
            ;;
        2)
            build_type="debug"
            build_command="flutter build apk --debug"
            print_color $GREEN "You selected: Debug build"
            ;;
        3)
            build_type="profile"
            build_command="flutter build apk --profile"
            print_color $GREEN "You selected: Profile build"
            ;;
        *)
            print_color $YELLOW "Invalid selection. Defaulting to release build."
            build_type="release"
            build_command="flutter build apk"
            ;;
    esac
    
    # Ask user if they want to install or upgrade
    print_color $YELLOW "Select installation method:"
    print_color $WHITE "1. Install (uninstalls first, clears all app data)"
    print_color $WHITE "2. Upgrade (preserves app data)"
    
    read -p "Enter your choice (1-2): " install_choice
    
    # Set installation method based on user selection
    case $install_choice in
        1)
            install_method="install"
            print_color $GREEN "You selected: Install (fresh installation)"
            ;;
        2)
            install_method="upgrade"
            print_color $GREEN "You selected: Upgrade (preserve data)"
            ;;
        *)
            print_color $YELLOW "Invalid selection. Defaulting to upgrade to preserve data."
            install_method="upgrade"
            ;;
    esac
    
    # Ask user which device to use for installation
    {
        # Get list of connected devices
        devices_output=$(adb devices 2>/dev/null)
        if [ $? -ne 0 ]; then
            print_color $RED "✗ Error: ADB not found or not accessible. Please ensure Android SDK is installed and in your PATH."
            exit 1
        fi
    
        # Parse device lines (skip first line which is "List of devices attached")
        device_lines=$(echo "$devices_output" | tail -n +2 | grep -v '^$')
    
        if [ -z "$device_lines" ]; then
            print_color $RED "✗ Error: No devices connected. Please connect a device and try again."
            exit 1
        fi
    
        # Parse device IDs
        device_ids=()
        while IFS= read -r line; do
            if [[ $line =~ ([^[:space:]]+)[[:space:]]+device ]]; then
                device_ids+=("${BASH_REMATCH[1]}")
            fi
        done <<< "$device_lines"
    
        # Handle case with multiple devices
        selected_device_id=""
        if [ ${#device_ids[@]} -gt 1 ]; then
            print_color $YELLOW "Multiple devices detected:"
            for i in "${!device_ids[@]}"; do
                device_info=$(adb -s "${device_ids[$i]}" shell getprop ro.product.model 2>/dev/null | tr -d '\r')
                print_color $WHITE "  $((i+1)). ${device_ids[$i]} - $device_info"
            done
    
            read -p "Select a device (1-${#device_ids[@]}): " device_choice
            device_index=$((device_choice - 1))
    
            if [ $device_index -ge 0 ] && [ $device_index -lt ${#device_ids[@]} ]; then
                selected_device_id="${device_ids[$device_index]}"
                device_model_info=$(adb -s "$selected_device_id" shell getprop ro.product.model 2>/dev/null | tr -d '\r')
                print_color $GREEN "Selected device: $selected_device_id - $device_model_info"
            else
                print_color $YELLOW "Invalid device selection. Using first device: ${device_ids[0]}"
                selected_device_id="${device_ids[0]}"
                device_model_info=$(adb -s "$selected_device_id" shell getprop ro.product.model 2>/dev/null | tr -d '\r')
            fi
        else
            selected_device_id="${device_ids[0]}"
            device_model_info=$(adb -s "$selected_device_id" shell getprop ro.product.model 2>/dev/null | tr -d '\r')
            print_color $GREEN "Using connected device: $selected_device_id - $device_model_info"
        fi
    } || {
        print_color $RED "✗ Error: Failed to detect connected devices."
        exit 1
    }
    
    # Set APK file path (handle Windows/Unix path differences)
    if [[ "$OSTYPE" == "msys" || "$OSTYPE" == "cygwin" ]]; then
        # Windows (Git Bash)
        apk_file="$(pwd)/build/app/outputs/flutter-apk/app-$build_type.apk"
    else
        # macOS/Linux
        apk_file="$(pwd)/build/app/outputs/flutter-apk/app-$build_type.apk"
    fi
    
    # Step 1: Run `flutter clean`
    print_color $YELLOW "Step 1/3: Running 'flutter clean' to clean the project..."
    if flutter clean; then
        print_color $GREEN "✓ 'flutter clean' completed successfully."
    else
        print_color $RED "✗ Error: Failed to run 'flutter clean'. Ensure Flutter is installed and in your PATH."
        exit 1
    fi
    
    # Step 2: Build the APK with selected build type
    print_color $YELLOW "Step 2/3: Running '$build_command'..."
    if eval "$build_command"; then
        print_color $GREEN "✓ '$build_command' completed successfully."
    
        # Get APK info
        if [ -f "$apk_file" ]; then
            file_size=$(stat -f%z "$apk_file" 2>/dev/null || stat -c%s "$apk_file" 2>/dev/null)
            if [ -n "$file_size" ]; then
                size_mb=$(echo "scale=2; $file_size / 1048576" | bc 2>/dev/null || echo "scale=2; $file_size / 1048576" | awk '{print $1/1048576}')
                print_color $CYAN "  APK built: $apk_file"
                print_color $CYAN "  Size: ${size_mb} MB"
            else
                print_color $CYAN "  APK built: $apk_file"
            fi
        else
            print_color $YELLOW "  Note: Expected APK not found at $apk_file"
            print_color $YELLOW "  Check the build/app/outputs/flutter-apk directory for your APK"
        fi
    else
        print_color $RED "✗ Error: Failed to build APK. Check for build errors."
        exit 1
    fi
    
    # Step 3: Install/upgrade on the previously selected device
    print_color $YELLOW "Step 3/3: Deploying the app to selected device ($selected_device_id - $device_model_info)..."
    
    {
        # Find the APK path for the current build type
        full_apk_path=""
        if [ -f "$apk_file" ]; then
            full_apk_path="$apk_file"
        else
            print_color $YELLOW "  Warning: Could not find the APK file. Looking for alternatives..."
            # Find any APK in the flutter-apk directory
            possible_apk=$(find "build/app/outputs/flutter-apk" -name "*.apk" -type f 2>/dev/null | head -n 1)
            if [ -n "$possible_apk" ]; then
                full_apk_path="$possible_apk"
                print_color $CYAN "  Found alternative APK: $full_apk_path"
            else
                print_color $RED "✗ Error: No APK files found. Build may have failed."
                exit 1
            fi
        fi
    
        # Install or upgrade the app based on user choice
        if [ "$install_method" = "install" ]; then
            # Use flutter install with the appropriate build type and device
            install_command="flutter -d $selected_device_id install"
            if [ "$build_type" = "debug" ]; then
                install_command="$install_command --debug"
            elif [ "$build_type" = "profile" ]; then
                install_command="$install_command --profile"
            fi
    
            print_color $CYAN "  Installing app on device $selected_device_id..."
            if eval "$install_command"; then
                print_color $GREEN "✓ App ($build_type build) installed successfully on device."
            else
                print_color $RED "✗ Error: Failed to install app using flutter install."
                exit 1
            fi
        else
            # Use ADB to install with the -r flag (upgrade) targeting specific device
            print_color $CYAN "  Upgrading app using adb (preserving data)..."
            upgrade_command="adb -s $selected_device_id install -r \"$full_apk_path\""
    
            upgrade_result=$(eval "$upgrade_command" 2>&1)
            if echo "$upgrade_result" | grep -q "Success"; then
                print_color $GREEN "✓ App ($build_type build) upgraded successfully on device $selected_device_id."
            else
                print_color $YELLOW "✗ Warning: There might be an issue with the upgrade: $upgrade_result"
                print_color $YELLOW "  Attempting fallback to flutter install..."
    
                # Fallback to flutter install with specific device
                install_command="flutter -d $selected_device_id install"
                if [ "$build_type" = "debug" ]; then
                    install_command="$install_command --debug"
                elif [ "$build_type" = "profile" ]; then
                    install_command="$install_command --profile"
                fi
    
                if eval "$install_command"; then
                    print_color $YELLOW "  Note: Fallback installation successful, but app data may have been lost."
                else
                    print_color $RED "✗ Error: Both upgrade and fallback installation failed."
                    exit 1
                fi
            fi
        fi
    } || {
        print_color $RED "✗ Error: Failed to deploy the app."
        exit 1
    }
    
    # End script
    print_color $CYAN "✓ Flutter build and deploy process completed successfully!"
    if [ "$install_method" = "upgrade" ]; then
        print_color $GREEN "The $build_type build of your app has been upgraded on device $selected_device_id, preserving app data."
    else
        print_color $GREEN "The $build_type build of your app has been freshly installed on device $selected_device_id."
    fi
    Bash

  • Uploading Debug Symbols

    Uploading Debug Symbols

    When uploading a new app bundle to Google Play Dev Console you can often get this warning:

    This App Bundle contains native code, and you’ve not uploaded debug symbols. We recommend you upload a symbol file to make your crashes and ANRs easier to analyze and debug.

    It can be a bit perplexing, but it’s quite easy to fix:

    1. After building and uploading your app bundle, go into the folder
      build/app/intermediates/merged_native_libs/release/out/lib
    2. There you’ll find these folders. Put them them all in a zip-file, that you can call symbols.zip

    –>

    1. When looking at your app bundles for the release (the page before then one that gives you the warning). Click the three dots next to your bundle, and select “Upload native debug symbols (zip)”

    Now you’re all set to move on with your release!


  • Serial communication notes

    Serial communication notes

    Just for my own reference. Common terminators in different formats.

    Uint8HexASCII CharacterEscapedDescription
    100x0ALF (Line Feed)\nMoves the cursor to a new line (next row)
    130x0DCR (Carriage Return)\rMoves the cursor to the beginning of the current line


  • Add Firebase Crashlytics to Flutter

    Add Firebase Crashlytics to Flutter

    (This article is a work in progress. Keeping it here for now as reference)

    This was done using Flutter version 3.27. But will probably work fine with little adjustments in later versions. I’m focusing on Android, but many steps apply for iOS too. I will update the article in the future to cover more platforms.

    1. Set Up Firebase Project

    1. Go to the Firebase Console
    2. Create a new project or select an existing one.
    1. Add your Flutter app:

    Enter your package name. You can find it in app/build.gradle. Look for applicationId in the defalutConfig.

    Then enter a nickname and klick Register App

    Download the google-services.json file. and follow the instructions on Firebase.

    Put it in the android/app folder.

    2. Add Firebase SDK to Your App

    1. Add the required firebase_crashlytics and firebase_core dependencies to your pubspec.yaml
    dependencies:
      firebase_core: ^3.10.0
      firebase_crashlytics: ^4.3.0
    YAML
    1. And run
    dart pub get
    Bash
    1. Add the google services and firebase plugins to Android.

    For this you can’t really follow the instructions on Firebase. The documentation for doing Android level stuff in Flutter is sometimes a bit off (even in Flutters own docs).

    So if you’re following the guide on Firebase, you’ll probably be looking for the plugins section in your build.gradle. It’s not there… It’s in settings.gradle

    Add google services plugin to android/settings.gradle

    // android/settings.gradle
    plugins {
        ...
        id 'com.google.gms.google-services' version '4.4.2' apply false
        id "com.google.firebase.crashlytics" version "2.8.1" apply false
    }
    Kotlin

    Add plugins to android/app/build.gradle

    // android/app/build.gradle
    plugins {
        ...
        id 'com.google.gms.google-services'
        id 'com.google.firebase.crashlytics'
    }
    Kotlin
    1. Install Firebase CLI and FlutterFire
    2. Use firebase cli to configure:
    flutterfire configure
    Bash
    1. Select the project you created earlier
    1. Select the platforms you want to configure, by using the up/down arrow keys and press space to uncheck items. Then press enter.
    1. Input you package name (the same that you used earlier. That you find in android/app/build.gradle -> applicationId

    3. Test Crashlytics

    1. Enable Crashlytics in Flutter
    ...
    import 'package:firebase_core/firebase_core.dart';
    import 'package:firebase_crashlytics/firebase_crashlytics.dart';
    
    void main() async {
      WidgetsFlutterBinding.ensureInitialized();
      
      // Initialize Firebase
      await Firebase.initializeApp();
    
      // Enable Crashlytics
      FlutterError.onError = FirebaseCrashlytics.instance.recordFlutterError;
    
      runApp(MyApp());
    }
    Dart
    1. Throw a test error somewhere in your code. Maybe on a button or gesture detector event. With this simple line:
    onTap: () {
      FirebaseCrashlytics.instance.crash();
    },
    Dart
    1. Go to the Firebase console and check for Crashlytics. If it doesn’t show up directly in the left menu, you can go to All Products and scroll down. Under Run, almost at the bottom, you’ll find Crashlytics. Klick it and it will shopw up in the left menu and stay there.

    You should have a crash in the list now.


  • Time String Helper

    Time String Helper

    Formatting Time in Flutter/Dart: A Simple Helper Class

    When working on Flutter projects, you might need to format durations into readable time strings. This could be for timers, media players, or activity trackers. To make this task a bit easier, here’s a lightweight helper class, TimeStringHelper, that handles common formatting needs.

    What TimeStringHelper Does

    Converts milliseconds into readable time strings.

    Formats durations into HH:mm:ss or mm:ss formats.

    Provides methods to extract minutes and seconds from a total duration in seconds.

    
    class TimeStringHelper {
      static String timeStringFromMilliSeconds(int milliseconds) {
        return timeStringFromSeconds((milliseconds / 1000).floor());
      }
    
      static String timeStringFromSeconds(int secondsDuration) {
        int hours = secondsDuration ~/ 3600;
        int minutes = (secondsDuration % 3600) ~/ 60;
        int seconds = secondsDuration % 60;
    
        var hoursStr = hours.toString();
        var minutesStr = minutes.toString().padLeft(2, '0');
        var secondsStr = seconds.toString().padLeft(2, '0');
    
        return hours > 0 ? "$hoursStr:$minutesStr:$secondsStr" : "$minutesStr:$secondsStr";
      }
    
      static int minutesFromTotalSeconds(int secondsDuration) {
        return secondsDuration ~/ 60;
      }
    
      static int secondsFromTotalSeconds(int secondsDuration) {
        return secondsDuration % 60;
      }
    }
    
    Dart

    How It Works

    Here’s a quick breakdown of how the methods in the class work:

    1. timeStringFromMilliSeconds

    Converts milliseconds to seconds and formats the result.

    
    print(TimeStringHelper.timeStringFromMilliSeconds(3661000)); 
    // Output: "1:01:01"
    
    Dart
    1. timeStringFromSeconds

    Formats seconds into a readable string. If the duration is an hour or longer, it includes the hours.

    
    print(TimeStringHelper.timeStringFromSeconds(3661)); 
    // Output: "1:01:01"
    
    print(TimeStringHelper.timeStringFromSeconds(61)); 
    // Output: "01:01"
    
    Dart
    1. minutesFromTotalSeconds
      This one returns an int. It’s useful if you want to create a duration time picker and need to set it to an initial value. So in my case I have a duration in total seconds and I want to get the minute wheel value from it.

    Calculates the total minutes from the duration.

    
    print(TimeStringHelper.minutesFromTotalSeconds(205)); 
    // Output: 3
    
    Dart
    1. secondsFromTotalSeconds
      This is the same as the last function, just for the remaining seconds.

    Extracts the remaining seconds after minutes are calculated.

    
    print(TimeStringHelper.secondsFromTotalSeconds(205)); 
    // Output: 25
    
    Dart

    This is my duration picker, where the user can pick a duration in minutes and seconds. I set the initial values using the two last functions.

    Why Use This?

    This class keeps time formatting simple and reusable. It’s not overly complex, but it can save time when working with durations in different parts of your app.


  • Use search terms in eloquent queries for Laravel

    Use search terms in eloquent queries for Laravel

    I needed to make an Eloquent query that could take search terms. The search terms are optional – no search term and the whole dataset is returned. In our particular data model the Users have one or many Associations.

    So the search term should check for user name, phone, email and association name. In the sub queries you simply foreach through the search terms and check if there is a match in any column.

    After the when-clause you can add any where-clauses that applies to every query, no matter the result of the search. In this case we only wanted users that are admins.

    $search = $request->get('search');
    $searchTerms = null;
    // Split search string at spaces if there is one
    if ($search) {
       $searchTerms = explode(' ', $search);
    }
    $users = User::orderBy($'created_at', 'DESC')->
              with('associations')->
              when($searchTerms, function ($q) use ($searchTerms) {
                  foreach ($searchTerms as $searchTerm) {
                      $q->orWhereHas('associations', function ($qa) use ($searchTerm) {
                          $qa->where('name', 'LIKE', "%{$searchTerm}%");
                      });
                      $q->orWhere('first_name', 'LIKE', "%{$searchTerm}%");
                      $q->orWhere('last_name', 'LIKE', "%{$searchTerm}%");
                      $q->orWhere('phone', 'LIKE', "%{$searchTerm}%");
                      $q->orWhere('email', 'LIKE', "%{$searchTerm}%");
                  }
              })->
              where('is_admin', 1)->get();
    PHP

  • Impersonate users with Sanctum in Laravel

    Impersonate users with Sanctum in Laravel

    I needed to write a somewhat clean solution to let an admin impersonate other users. Which basically means that one user can appear as another user – without having to get access that users credentials to log in.

    The most obvious use case for this would be when an admin needs access to a user’s account. The app I did this for relies heavily on user created data, so this is very useful when customer service needs to look into any problems the users may have. 

    Earlier we were using Tymon JWT for authentication and it was quite easy to implement impersonation it with Rickycezar/laravel-jwt-impersonate

    But after migrating to Sanctum for authentication I needed to come up with something else. Here’s my solution (I posted this first in a stackoverflow thread).

    How it works

    In front end admins can view a list of all users, where they can klick a button to triggers the impersonate endpoint for any user. After doing this the admin will appear to the system as the impersonated user.

    When getting the response from the endpoint, front end sets a switch to keep track of that the current user is an impersonation – and to shows a button to leave impersonation. In essence what happens in front end is just that the access token is replaced when starting and ending an impersonation. 

    In backend what what happens is:
    Impersonate
    1. Create a new access token for the impersonated user
    2. Save a connection between this impersonation and the admin user 
    3. Delete the admin’s access token
    4. Send the new access token back

    Leave impersonation
    1. Create a new access token for the admin connected to the impersonation token
    2. Delete the impersonation token
    3. Send the new access token back

    It’s quite simple. So here we go: 

    1. Migration

    First we write a migration that will create a new table called impersonations. This table will store the connection between a personal access token and the impersonating user.

    public function up()
    {
        Schema::create('impersonations', function (Blueprint $table) {
            $table->id();
            $table->bigInteger('personal_access_token_id')->unsigned();
            $table->bigInteger('user_id')->unsigned();
            $table->timestamps();
    
            $table->foreign('personal_access_token_id')
            ->references('id')
            ->on('personal_access_tokens')->cascadeOnDelete();
    
            $table->foreign('user_id')
            ->references('id')->on('users')->cascadeOnDelete();
        });
    }

    2. User model

    Add three function to your USER model. These functions are used to determine if a user can impersonate others, can be impersonated by others and if the user is currently impersonating. You can make up your own rules for who can impersonate or get impersonated – just add whatever logic you want to the canImpersonate and canBeImpersonated functions.

    I chose to only let admins impersonate and only non admins to be impersonated.

    public function canImpersonate()
    {
        return $this->is_admin;
    }
    
    
    public function canBeImpersonated()
    {
        return !$this->is_admin;
    }
    
    
    public function isImpersonated() {
        $token = $this->currentAccessToken();
        return $token->name == 'IMPERSONATION token';
    }

    3. Impersonation Controller Functions

    Add two functions. One to start impersonation (take the persona of another user), and one function to leave impersonation (go back to your own user).

    In my case i have an AdminController. But you can put these functions wherever it makes sense to you. Maybe you want a dedicated ImpersonationController.

    In these function there are two users – the impersonator and the persona. The impersonator is the admin who wants to access the system as another user, and the persona is the user that’s being impersonated.

    Also you can modify the responses to however you prefer it for your frontend app. You most likely want to keep track of whether the user is actually impersonating another user, so you can add button for the admin to go back to its own account. I used the same structure as Rickycezar/laravel-jwt-impersonate so the we didn’t have to make any changes in front end from our old solution.

    // START IMPERSONATION
    public function impersonate($userId)
    {
        $impersonator = auth()->user();
        $persona = User::find($userId);
    
        // Check if persona user exists, can be impersonated and if the impersonator has the right to do so.
        if (!$persona || !$persona->canBeImpersonated() || !$impersonator->canImpersonate()) {
            return false;
        }
    
        // Create new token for persona
        $personaToken = $persona->createToken('IMPERSONATION token');
    
        // Save impersonator and persona token references
        $impersonation = new Impersonation();
        $impersonation->user_id = $impersonator->id;
        $impersonation->personal_access_token_id = $personaToken->accessToken->id;
        $impersonation->save();
    
        // Log out impersonator
        $impersonator->currentAccessToken()->delete();
    
        $response = [
            "requested_id" => $userId,
            "persona" => $persona,
            "impersonator" => $impersonator,
            "token" => $personaToken->plainTextToken
        ];
    
        return response()->json(['data' => $response], 200);
    }
    
    
    // LEAVE IMPERSONATION
    public function leaveImpersonate()
    {
        // Get impersonated user
        $impersonatedUser = auth()->user();
    
        // Find the impersonating user
        $currentAccessToken = $impersonatedUser->currentAccessToken();
        $impersonation = Impersonation::where('personal_access_token_id', $currentAccessToken->id)->first();
        $impersonator = User::find($impersonation->user_id);
        $impersonatorToken = $impersonator->createToken('API token')->plainTextToken;
    
        // Logout impersonated user
        $impersonatedUser->currentAccessToken()->delete();
    
        $response = [
            "requested_id" => $impersonator->id,
            "persona" => $impersonator,
            "token" => $impersonatorToken,
        ];
    
        return response()->json(['data' => $response], 200);
    }

    4. Routes

    Last and least, the routes. Remember that if you’re using a middleware to protect the impersonate route, so only admins can access it, you need to put the leave impersonation route outside that middleware. Since the persona taken by the admin most likely wont be a admin

    // Impersonate
    $api->get('/impersonate/take/{userId}', [AdminController::class, 'impersonate'])->name('users.impersonate');
    
    // Leave impersonation
     $api->get('/impersonate/leave', [AdminController::class, 'leaveImpersonate'])->name('users.leaveImpersonate');

  • Round integer to 10, 100, 1000 etc.

    Round integer to 10, 100, 1000 etc.

    If you need to shave off the last few digits of a big int, you can use this simple solution. Came in handy for me when working with milliseconds in timers. Basically you cast the integer to a double and divide it by the number of 0’s you want at the end. Then round, ceil or floor it and turn it back into an int.

    For type safety you might have to do some more meticulous work, depending on the language you’re working in. Here’s an example in Dart.

    var integerToRound = 31555;
    var roundedInteger = (integerToRound / 10).floor() * 10;
    
    print(roundedInteger);
    
    //output: 31560
    Dart

    Change the divider and multiplier to the number of zeros you need.

    var integerToRound = 31555;
    var roundedInteger = (integerToRound / 100).floor() * 100;
    
    print(roundedInteger);
    
    //output: 31600
    Dart


  • Calculate price excluding VAT

    Calculate price excluding VAT

    Sometimes you need to calculate the price of a product excluding VAT, and the only details you have is the amount including vat and the vat percent. This might be a bit tricky in some applications when there are mixed VAT percentages.

    For example, you paid 1000 space credits and in that sum there is a 12% VAT included. If you need to find out how much of the 1000 is actual VAT you can use this simple function:

    function getAmountWithoutVat(amountIncludingVat, vatPercent) {
    
      var amountExVat = amountIncludingVat / (100 + vatPercent) * 100;
      var sumVat = amountIncludingVat - amountExVat;
      var amounts = {
        "priceExVat": amountExVat.toFixed(2),
        "vat": sumVat.toFixed(2)
      };
    
      return amounts;
    }
    
    console.log(getAmountWithoutVat(1000, 12));
    JavaScript

    Output:

    {
      priceExVat: "892.86",
      vat: "107.14"
    }
    JavaScript


  • Convert short color hex to pair

    Convert short color hex to pair

    If you have a three digit hex for a color. For example #FFF and want to convert it to a 6 digit number here’s a simple way:

    // Expects 3 digit hex, like '#FFF';
    function uniformColorHex(hex) {
    
      let newHex = "#" +
        hex.charAt(1) +
        hex.charAt(1) +
        hex.charAt(2) +
        hex.charAt(2) +
        hex.charAt(3) +
        hex.charAt(3);
    
      console.log(hex + " => " + newHex);
      return newHex;
    }
    JavaScript